Abusing DNS, Part 2: Serving up some fun.


As we continue to explore how hackers take advantage of DNS, our goal for part 2 is to get into some rust code and build a server that has enough functionality that it will be able to respond to simple DNS requests. If you missed it, check out Part 1 for an overview and refresher on the protocol. Follow along or jump to the source code here.
Let's write a server!
I'm going to assume you have rust installed. Up first let's create our project and add some dependencies.
$ cargo new dns-kv && cd dns-kv
$ cargo add tokio -F full
$ cargo add simple-dns
$ cargo add tracing, tracing-subscriber, bincode, data-encoding
$ cargo add tracing
$ cargo add tracing-encoding
$ cargo add tracing-subscriber
$ cargo add bincode
$ cargo add data-encoding
$ cargo run
...
    Finished `dev` profile [unoptimized + debuginfo] target(s) in 0.04s
     Running `target/debug/dns-kv`
Hello, world!And a client!?!?!
Just kidding, Part 3 will be devoted to the client. For now though, lets setup our project so that we can have a server and a client.
dns-kv$ mkdir src/bin
dns-kv$ mv src/main src/bin/server.rs
dns-kv$ cp src/bin/server.rs src/bin/client.rs
Now we have two binaries in our project. You run them like this.
dns-kv$ cargo run --bin server
   Compiling dns-kv v0.1.0 (/home/evan/dns-kv)
    Finished `dev` profile [unoptimized + debuginfo] target(s) in 0.25s
     Running `target/debug/server`
Hello, world!
dns-kv$ cargo run --bin client
   Compiling dns-kv v0.1.0 (/home/evan/dns-kv)
    Finished `dev` profile [unoptimized + debuginfo] target(s) in 0.24s
     Running `target/debug/client`
Hello, world!
For real lets write a server
Rust forces you to think about errors and error handling from the start. If your rust code is confusing or painful... You aren't doing errors right. Luckily we can start off pretty simple and handle more complicated errors as we run into trouble.
// Easy mode error handling.
type Result<T> = core::result::Result<T, Error>;
type Error = Box<dyn std::error::Error>;
This is one of the best videos on rust error handling I've found.
Now you can update your main function in src/bin/server.rs with the following.
#[tokio::main]
async fn main() -> Result<()> {
    // everybody love logging
    use tracing_subscriber::{fmt, prelude::*, EnvFilter};
    tracing_subscriber::registry()
        .with(fmt::layer())
        .with(EnvFilter::new(std::env::var("RUST_LOG").unwrap_or_else(
            |_| format!("{}=debug", env!("CARGO_CRATE_NAME")),
        )))
        .try_init()?;

    // create teh server socket and listen on 5353
    let socket = UdpSocket::bind("0.0.0.0:5353").await?;
    tracing::info!("listening on {}", socket.local_addr().unwrap());

    let socket = std::sync::Arc::new(socket);
    let mut buf = vec![0u8; 2048]; // max dns packet is 512

    loop {
        let socket = socket.clone();
        let (size, peer) = socket.recv_from(&mut buf).await?;
        let data = buf[..size].to_vec();
        // Spawn a new task for each incoming datagram
        tokio::spawn(async move {
            tracing::debug!("received {} bytes from {}", size, peer);
            let rv = handle_dns_query(socket, data, peer).await;
            if let Err(e) = rv {
                tracing::debug!("{e:?}");
            }
        });
    }
}
Let's break that down. #[tokio::main] is a macro from the asynchronous tokio project. That is right, we are using async code so our server will be blazingly fast.
Our main function returns Result<()> this magic can happen because we defined above.
Next up we setup tracing. Because everybody loves logging.

Finally in the loop we listen for connections and spawn tasks to read from the socket and handle the requests in handle_dns_query.
Handling the request
Let's take a look at handle_dns_query
async fn handle_dns_query(socket: Arc<UdpSocket>, data: Vec<u8>, peer: SocketAddr) -> Result<()> {
let packet = Packet::parse(&data)?;
let mut response = packet.clone().into_reply();
for q in packet.questions {
let answer = match q.qtype {
QTYPE::TYPE(TYPE::A) => Ok(parse_a_query(q).await?),
QTYPE::TYPE(TYPE::AAAA) => Ok(parse_aaaa_query(q).await?),
QTYPE::TYPE(TYPE::TXT) => Ok(parse_txt_query(q).await?),
_ => Err("invalid type"),
}?;
response.answers.push(answer);
}
let rd = response.build_bytes_vec()?;
socket.send_to(&rd, peer).await?;
Ok(())
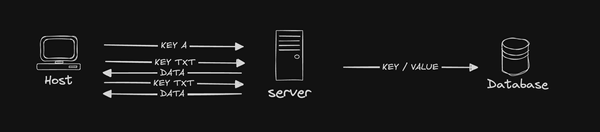
}This function takes a copy of the UDPSocket, the data to process and information about the peer aka who made the request. It then parses the data into a DNS packet and prepares a response. Next it iterates over the questions in the packet and hands them off to a function that handles the specific response.
Let's look at the first query handler parse_a_query
async fn parse_a_query(q: Question<'_>) -> Result<ResourceRecord<'_>> {
    Ok(ResourceRecord::new(
        q.qname,
        CLASS::IN,
        2,
        RData::A(A {
            address: u32::from_be_bytes([41, 41, 41, 41]),
        }),
    ))
}
Like the name implies, this function is handling an A query. For now it isn't doing much, just responding with a static response. As saw last week and IP address is just a funky way of encoding a number.
For fun, this is what that conversion looks like in python.
>>> socket.inet_ntoa(struct.pack('>BBBB', 41,41,41,41))
'41.41.41.41'
Wrap it up

We are in the home stretch, lets run the server and test it out with dig. In one shell run the server.
dns-kv$ cargo run --bin serverAnd in another shell test it out.
dns-kv$ dig +short @127.0.0.1 -p 5353 A test.com
41.41.41.41
dns-kv$ dig +short @127.0.0.1 -p 5353 AAAA test.com
::41.41.41.41
dns-kv$ dig +short @127.0.0.1 -p 5353 TXT test.com
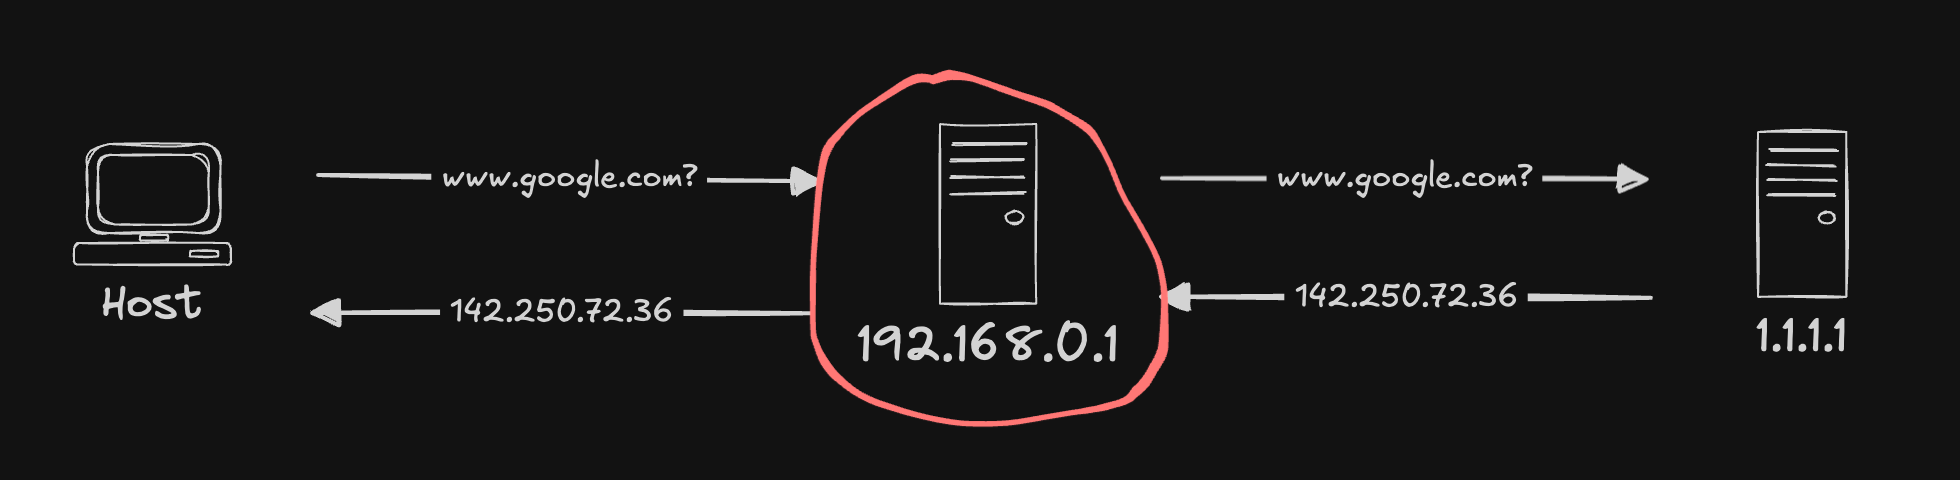
"AAAA"Amazing! We've done it. In the first command we use dig to ask our server on 127.0.0.1 port 5353 what the A record is for test.com and as we expected, we get back 41.41.41.41. We then do the same to check that the AAAA and TXT records are working as we expect.
Call to action
Check out Part 1 to see where this all started, subscribe if you want to see more, follow me up on the butterfly site if you want some more memes or to make fun of my non-sense. See you next week in Part 3 where we will be building the CLI client with clap.